
Ingredients for Red Velvet Cake
For the Cake Base:
- Flour (00 type): 250 grams
- Sugar (colored): 250 grams
- Buttermilk or White Yogurt: 250 grams
- Eggs: 3
- Soft Butter (room temperature): 120 grams
- Bitter Cocoa: 15 grams
- Vanilla Extract: 1 teaspoon
- Red Gel Dye: 4 drops
- Baking Soda: 1 teaspoon
- Apple Cider Vinegar: 1 teaspoon
- Salt: 1 pinch
For the Cheese Cream Frosting:
- Sweetened Whipping Cream: 500 grams
- Cream Cheese: 250 grams
- Mascarpone: 250 grams
- Icing Sugar: 100 grams
- Vanilla Extract: 1 teaspoon
For Decorating:
- Fresh Strawberries or Other Fresh Fruit: as needed
Additional Items Needed:
- Butter: for greasing
- Flour: for dusting
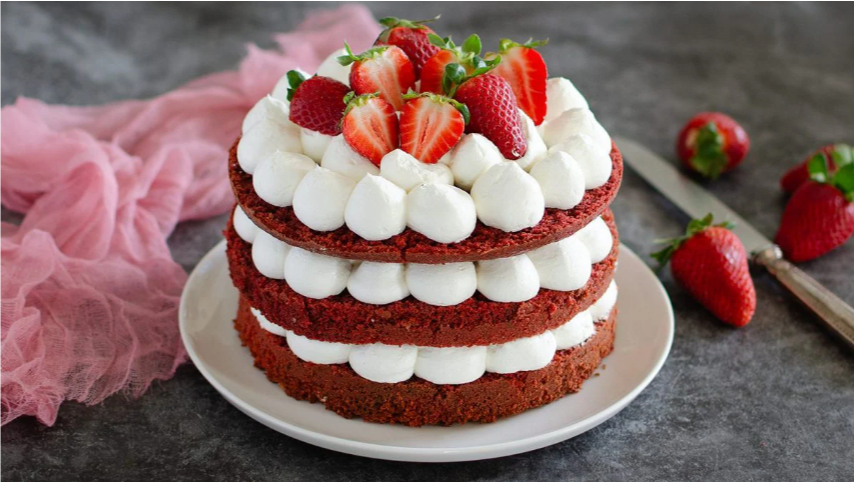
Red velvet cake, a staple of American desserts, features a vibrant red base and creamy cheese frosting, offering a striking visual and taste contrast.
This iconic cake originated in New York in the early 1900s, with the Waldorf-Astoria Hotel popularizing its modern version.
Known for its slight acidity balanced by a velvety cheese cream, it’s perfect for special occasions.
The base, made from common ingredients like flour, eggs, sugar, and buttermilk, can be prepared in advance to ensure moisture and consistency.
Often garnished with fresh berries or decorative crumbs, red velvet cake combines simplicity in preparation with the elegance of presentation.
How to Prepare Red Velvet Cake
How to Prepare the Base:
- Step 1: Start by creaming the butter and sugar together with an electric mixer. Add eggs one at a time, ensuring each is fully incorporated before adding the next.

Step 2: Mix the buttermilk with the red dye.

Step 3: Combine the colored buttermilk into the creamy mixture thoroughly.

Step 4: Gradually mix in the sifted flour and bitter cocoa.

Step 5: Stir the mixture with a spatula until smooth and velvety, then enhance with vanilla extract.

Step 6: In a separate bowl, combine apple cider vinegar, salt, and baking soda, mix quickly, and fold into the batter.

Step 7: Pour the batter into an 18 cm diameter hinged mold that has been buttered and floured, and bake at 175°C (347°F) for 40 minutes. Use a toothpick to check for doneness, then let cool on a wire rack.

How to Prepare the Filling and Assemble the Cake:
- Step 8: Prepare the cream cheese filling by whipping together mascarpone, spreadable cheese, cold cream, vanilla extract, and icing sugar until stiff and smooth.

Step 9: Slice the cooled cake horizontally into three equal layers.

Step 10: Place the bottom layer on a plate and pipe the first layer of cream starting from the edges.

Step 11: Fully cover the base layer with cream.

Step 12: Add the second cake layer and repeat the cream application.

Step 13: Place the final cake layer on top and cover with the remaining filling.

Step 14: Decorate the top of the cake with the remaining cream and fresh strawberries, either whole or halved.

Step 15: Refrigerate the assembled cake for 1 hour to set before serving.

Advice and Storage for Red Velvet Cake
Advice:
- Buttermilk Alternatives: If you can’t find buttermilk, it can be replaced with white yogurt or other homemade alternatives. Buttermilk is available in well-stocked supermarkets or ethnic shops, or you can make it at home.
- Achieving the Perfect Red Hue: To ensure the characteristic red color of the cake, carefully measure the bitter cocoa and use either powder or gel dye. This helps maintain the vibrant color through the baking process without fading.
Storage:
- Cake Storage: The red velvet cake should be stored in the refrigerator, well-covered, and can be kept for up to three days.
- Storing the Base: If you have an unfrosted base, it can be stored at room temperature, wrapped in cling film, for up to two days to maintain its freshness.
- Cream Storage: Any leftover cream should be stored in an airtight container in the refrigerator and used within three days.
These tips help maintain the quality and freshness of your red velvet cake, ensuring that every slice is as delicious as the first.